Sunday, October 10, 2010

Septembers SU Club kits.

Halloween Card:

Supplies:


Stamps:
Fang-tastic

Paper:
Peach Parfait (in Color)
Elegant Eggplant (regals)
Basic Black waffle paper
Whisper White (neutrals collection)
Ink:
Basic Black ink pad
Basic Gray Ink pad

Other:
Spider Web textured embossing folder
snail adhesive
Stampin' Dimensionals


Pumpkin:


Stamps:
Day of Gratitude Set

Paper:
Whisper White Card Stock
Cajun Craze Textured Card Stock
Autumn Spice Designer Series Paper

Ink
Old Olive Classic Stampin' Pad

Accessories &Tools
Brights Designer Buttons
Neutrals 5/16" Jumbo Brads
Stampin' Dimensionals
Crop-A-Dile
Big Shot
Leaves #2 Originals Die
Spray bottle with water

Instructions

1. Cut Cajun Craze strips to ¾” by 6” Stack 12 to 14 strips, and punch holes in both ends using Crop-A-Dile. Secure strips together on one end using Silver 5/16" Jumbo Brad, and fan out into circle shape. To form into sphere, secure other end of strips together using second Silver 5/16" Jumbo Brad.

2. Cut Old Olive card stock to 1/8” by 8.5” Spray thin strips of Old Olive Card Stock with water, and wrap around dowel or Stampin' Write Marker. Allow to dry, then remove from marker.

3. Cut leaves from Autumn Spice Designer Series Paper using Big Shot and Leaves #2 Originals Die. Adhere leaf and curly stem from previous step to top of each pumpkin using Stampin' Dimensionals.

4. Stamp leaf image in Old Olive ink on Whisper White Card Stock. Cut out, and adhere one to larger leaf to the top of pumpkin using Stampin' Dimensionals.

5. Adhere button one to top of each pumpkin.

Tips:
~ I put the brads in upside down so the tops are inside the pumpkin
~ I secured them on both ends and then took half and pulled it around to the other side, then spread them out one by one. I found if you pushed the pile in a little it made it easier to get them apart.


Painted Canvas.

I found these really neat square canvases at Big Lots so I thought they would make great gifts. Its the 1st time I've used acrylic paints so I'm really happy with how they came out.

This one is for my niece Alyssia:

This one is for my nieces Nicole.

And this one is for my NSSS Becca:

Sunday, September 12, 2010

Mosaic

Last weekend I had a girls day out with my mom and 2 nieces, and we went to Creative Sparks. Creative Sparks is a cute little ceramic shop. I couldn't decide what I wanted to paint so I decided to do a mosaic instead. Here's what I did:

Sunday, August 29, 2010

Stampin Up Club 2

I've have a few more ladies interested in the club so I'm working on putting another club together. It will be very similar to the other club but will be 5 months instead of 6. here are all the details.


How the club works:

Each month a different member gets titled as the "host" and everyone in the group submits an stampin up order by the 15th, orders must be $30 or more (+ tax and $4 toward shipping, I'll pay the rest of shipping) The host that month will get at least a host level one gift and at least $15 in free product. The club will run from October - Feb

In addition each member will get

• A welcome kit, which includes

◦a '10-'11 catalog

◦current mini (any mini's that come out during the group will be sent as they are released)

◦A color chart (these are hand made and not something you can get from Stampin Up)

◦Plus some more but I don't want to give away all the surprises.

•2 project kits each month (one card, plus one other kit which could be a altered item, 3d project, another card, etc)

•plus a chance to win some other goodies.

If your interested or have any questions feel free to e-mail me at chrtob@msn.com

Saturday, August 21, 2010

Stampin Up Club

I'm working on putting together a on-line Stampin up club, I already have 4 spots filled and I'm looking for 2 more to complete the club.

How the club works:

Each month a different member gets titled as the "host" and everyone in the group submits an stampin up order by the 15th, orders must be $25 or more (+ tax and $4 toward shipping, I'll pay the rest of shipping) The host that month will get at least a host level one gift and at least $15 in free product.

In addition each member will get

  •  A welcome kit, which includes
    • a '10-'11 catalog
    • current mini (any mini's that come out during the group will be sent as they are released)
    • A color chart (these are hand made and not something you can get from Stampin Up)
    • Plus some more but I don't want to give away all the surprises.
  • 2 project kits each month (one card, plus one other kit which could be a altered item, 3d project, another card, etc)
  • plus a chance to win some other goodies.
If your interested or have any questions feel free to e-mail me at chrtob@msn.com
      

Monday, August 16, 2010

Wedding gifts

This past weekend my DH's cousin got married, and of course I waited until the last minute to do her gift so I couldn't find what I was looking for so this is what I came up with instead:

Her invitation, which was the inspiration for my card. (sorry this is side ways I tried fixing it twice but it keeps posting side ways)

My card:


Coasters - made from glass tiles:

Etched mirror:

Tuesday, August 3, 2010

Projects for my Not So Secret Sister

Each month we make something for each others package. Here are the goodies I made for July and Aug. It's also Becca's and her kids birthdays this month so I made them some extra special goodies.

Freezer shirts

This one is for her little girl:


For her little boy:


Can you guess who these are for?


This one didn't photograph well...


Each shirt got rolled up and tucked into a little tin that I found at target and then I added some other goodies, her are the tins that I altered.


Lastly I altered a picture frame for Becca. You can see in the background the gifts all wrapped up.

couple of cards

I made these 2 cards awhile ago but forgot to post them. I made them with some new SU goodies.


Sunday, August 1, 2010

Cherry on Top Award


The rules in accepting this award are:

1. you must thank the person who passed it on to you,
2. copy award to your blog.
3. list three (3) things you love about yourself,
4. post a picture that you love on your blog, and
5. pass award on to five (5) others

First thank you to 2 ducky designs she is a super creative women and I'm flattered that she would pick me to pass on an award to. THANKS Again!!!

Now on to the hard part, 3 things I like about myself...hmmm...Well I love my laid back and loving personality, its gotten me far in my life and career. My blue eyes, there a really cool combo of my mom's dark bright blue eyes and my dad's pale blue gray eyes. Umm, one more...I guess it would be my creativity. Its always kept me busy and entertained.

Favorite pictures, I'm going to post 2.

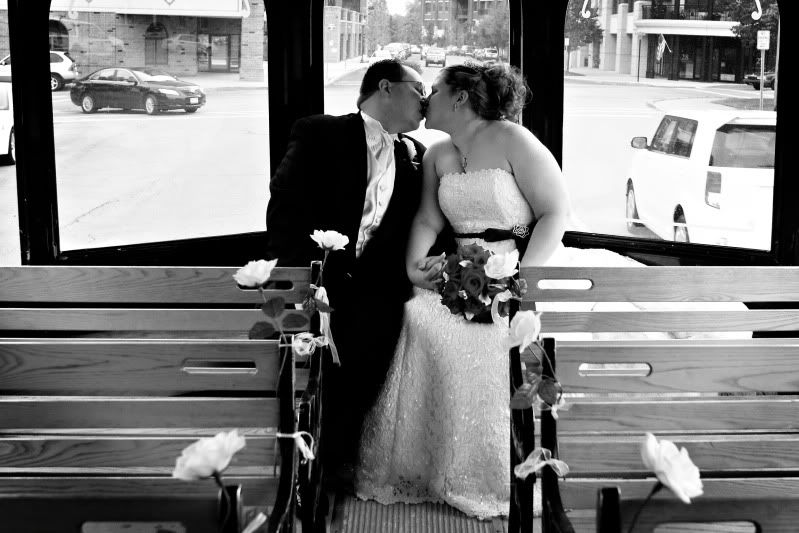
This is one of my Favorites from our wedding day almost 2 yrs ago. I've been with my hubby since I was 15, he's an amazing guy and we balance each other out well.

Second picture is of my 2 babies. Yes they are pit bulls and they are the best dogs on earth! They make me laugh and Auhh every day and they are always happy to see me. Aren't they cute???!!!

Now to pass this on to 5 other blogs, Make sure you check out these creative ladies.

Will you be my bridesmaid card

I made this card over a month ago but was waiting for it to be posted on the wedding with the cricut blog but that's not looking like its going to happen, so I'm going to go ahead and post it as I think it looks awesome.

This project is for all those brides out there. One of the new theme’s in wedding planning is to send a card to the girls asking them to be in your bridal party. Brides are including these cards in a small package of goodies, or with a note about how important that person is to them.

Here is the card that I came up with.


To get the girls to stand up on the inside I used these pop up cards that I found at a stamping expo. You can find these cards at www.denamidesign.com if you’re interested; they are the three column. I bought a few different types to use as templates to make my own. I used another one to make a template for all of you. I wrote the measurements on it for you to see. It’s a bit hard to see in the picture but the dotted lines are the ones one top of each of the little columns.


If you cut and score as you are supposed to the card should look like this


Once I had my card cut and scored I covered the outside with the black poka-dotted paper, cut to 5.5” X 8.5”, which is from Me&My Big Ideas in their Mambi pack. Then using the Story book cartridge, I cut the Brushed silver paper from SU. I set the cricut to 4.5”, and blackout, shift and then Marquee 4. For the White I used Glossy White from SU and did the same as above but used the fancy corner key instead of black out. I cut the letters at 0.75” cutting twice once on shadow using Basic Black from SU and once with no keys set with Very Vanilla from SU.

For the inside I used the measurements posted above to cut my paper to fit around the area that popped up. I then cut the girls from the Forever Young Cartridge. The “bride” is model 19, and the Bridesmaids are model 20. I cut all at 2.5”. The brides dress is cut using the Glossy White paper. To do the Bridesmaids, I cut 2 normally and then the other 2 with the flip key on. I then cut just their dresses out of Basic Black, then with the layer key I cut the dress again using Real Red.
I’ve had this card in my head for awhile before I made it, and I was really surprised at how easily this card went together. I hope you all enjoyed today’s project!